Tuesday, January 17, 2012

mason salt jar.

i always want to start each post with "this is my new favorite thing", but that's not very original and really, how many favorites can one girl have? 


a lot.


i've discovered that i love mason jars. they are wonderful, versatile, fairly cheap, easy to find, beautiful, and wonderful. i came across the easiest project ever on pinterest, and to make it even better, it cost me nothing. those are the best kinds of projects. 


creative idea #5: mason salt jar
idea sparked by: TheCraftPatch


tools:
  • mason jar
  • salt with round top [i don't recommend the salt at Aldi - the pour spout was covered in gunk. note the difference between the tutorial pics and the finished product, which has a Morton brand spout]
  • scissors
  • pen or pencil
  • Exacto knife
  • felt or other thick fabric
  • scrapbook paper
directions:


  •  remove top from salt container.
  • cut off the rim.


  • remove the lid from the mason jar. use the lid to cut the salt top to size.
  • awesome? yes. attractive? no. 
  • use the mason jar lid and pencil to trace scrapbook paper to fit. cut it out.
  • set the salt top on the scrapbook paper. Pull the spout open, stick your pencil in the hole, and trace the spout shape.
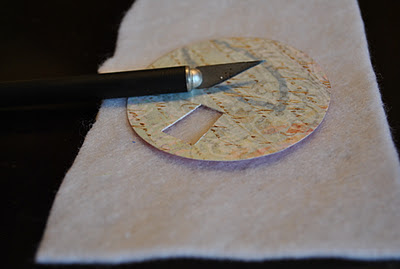
  • set the scrapbook paper on the felt [to keep from scraping the table] and cut AROUND [not on] the shape you traced [it needs to be a bit bigger than what you traced or it wont fit]

  • pour salt in mason jar, fit scrapbook paper over salt top, place new top in mason jar ring, screw on tight.

now, every time a recipe calls for salt, my heart skips a beat. mason jars are way better than cardboard tubes. i'm all about any little thing that makes life more beautiful and cooking more fun, especially if it can be done on the cheap.

the blogger at TheCraftPatch used her jar for yeast because she bakes a lot. if you think of something else this could be used for, i'd love to hear it!

love and a girly kitchen,
amber.

Thursday, January 12, 2012

antiquing paper.

this is one of my new favorite things. like always, i came across it on pinterest. i was searching for a way to make old and worn ornaments for our church's Journey to Judea Christmas event and this was so cheap, easy, and amazing that i couldn't pass it up.


creative idea #4: antique Paper {in this case, for ornaments}
idea sparked by: AGlimpseInsideBlog


Materials:


  • paper {can be from a book or something you print off yourself. If printing, do this before you start. I chose card stock for a more sturdy ornament Also, i tried printing in brown the first time i did this, only to have it fade more than i was wanting. it looked great for some things, but for this, i preferred to print in black (which didn't fade). Play around with it!}
  • cookie sheet
  • coffee
  • oven mit
Directions:
  • preheat oven to 200
  • lay your paper on the cookie sheet {you can do straight edges, or tear them.}
  • pour just enough coffee to cover the paper. {for this mini sized cookie sheet and one piece of paper, i used less than a 1/4 cup}


{sorry, i haven't perfected my taking-pictures-in-a-dark-oven skills...}
  • set the timer for 20 min. it prob wont be done that quick, but use it as a gauge for how much longer you should leave it in for. You'll know it's done when the edges start to peel off the cookie sheet. if it didn't peel off very high, take a butter knife and gently pop off the rest of the edges.

  • get creative with how you use these! You can frame them, glue string to the back for an ornament, or as the blogger at AGlimpseInside did, you can make multiple, roll them up, tie them with hemp, and put them in a vase :-)
love and good uses for coffee,
amber.

Thursday, January 5, 2012

my decoupage addiction.

there's no exaggerating here, i really am addicted. i would decoupage everything in our house if i could, but so far i've only covered 2 pieces of furniture :-) this project was an old bookcase from my parents that needed a little love. Warning, this is a project from a few years ago and my pics are not too hot. oh well. i still like the bookcase.
creative idea #3: map bookcase
idea sparked by: sweet decoupage projects everywhere!


for those of you who have never decoupaged - it's super easy! all you need is:

  • Mod Podge {or you can make it yourself by mixing 50% water and 50% glue in an empty bottle and shaking it up}
  • a paint brush
  • an object {furniture, clip board, box, etc, etc.}
  • whatever you want to cover it with {fabric, scrapbook paper, maps, newspaper, etc.}


Step 1 - cover a medium sized section with Mod Podge. if you do too much at a time it will dry before you can get it covered. also, try to keep your brush tip in the glue so it doesn't dry out.


Step 2 - working quickly, cover glue with desired amount of paper. if you want, you can crumple the paper, flatten it out, and tear into sections. i preferred this so my perfectionist self would be ok with things not lining up or the maps bubbling up as they dried. i started by covering the top with one map and then folding the excess over the sides of the bookcase.


i continued by tearing off the most interesting parts of the maps {found in old National Geographic Magazines} so that every part of my bookcase would be appealing.


ta-da! all done! it took me two days off and on, and i'm so excited about the way it looks. i love decoupage because the possibilities are endless - don't overlook the cheap dresser on craigslist that looks hideous - cover it with something beautiful, replace the knobs, and you have something unique to match your space :-)


love and mod podge,
amber.